Hinter Therabändern verbergen sich bunte Latexbänder – aber das muss man wohl kaum jemandem erklären. Schon seit Anfang der 80er Jahre wird das praktische Trainingsgerät für Kraft- und Stabilisationstraining, in Reha- und Physiotraining eingesetzt. Auch für uns Triathleten ist das Mini-Fitnessstudio perfekt geeignet. Wir stellen euch zehn Übungen vor.
Wer die Latexbänder der Marke Theraband nutzt, der kann zwischen acht unterschiedlichen Farben wählen. Doch Vorsicht: Die Wahl sollte nicht passend zum Shirt erfolgen. Vielmehr steht jede Farbe für einen bestimmten Härtegrad. Beginnend mit dem beigen Band, dass bei Dehnung auf doppelte Länge 1,1 Kilogramm Kraft entwickelt, steigert sich diese auf 6,4 Kilogramm beim goldenen Band.
Richtiges Band auswählen
Die Wahl des richtigen Härtegrades ist dabei die Grundvoraussetzung für ein verletzungsfreies und erfolgreiches Training mit dem Theraband. Wie für jedes Training gilt deshalb: Lieber vorsichtig herantasten, als etwas riskieren. Das Risiko bei falscher Wahl liegt in Überlastungs- und Verletzungsgefahr. Wer das richtige Band hat, kann Übungen mindestens 10-15 Mal sauber und fehlerfrei ausführen. Wer dann merkt, es steckt noch mehr in ihm, macht entweder einen Satz mehr, oder greift das Band einfach etwas kürzer und erhöht damit die Schwierigkeit.
Einsatz des Therabandes
Das Theraband ist nicht zuletzt aufgrund seiner einfachen Handhabung seit vielen Jahren kaum wegzudenken. Zusammengefaltet passt es in jede Tasche. Egal ob zu Hause, im Schwimmbad, im Hotelzimmer oder im Freien – es lässt sich einfach überall nutzen. Alles, was man braucht, ist Motivation und Körperspannung.
Diese vorausgesetzt, kann es losgehen. Entweder, man widmet sich seinen individuellen „Problemstellen“, oder man baut die Übungen mit dem Band in sein allgemeines Athletiktraining ein. Besonders zur Verletzungsnachsorge bzw. Prophylaxe empfiehlt es sich im Vorfeld den Rat eines Physiotherapeuten oder geschulten Trainers einzuholen. Hier kann fehlerhafte Übungsausführung noch schneller zu Problemen führen.
Ganz grundsätzlich gilt es jedoch für alle Übungen zu beachten:
- Körperspannung beachten.
Jede saubere Übungsausführung beginnt mit stabilem Rumpf und aufrechter Haltung. - Atmung beachten.
Niemals die Luft anhalten, sondern regelmäßig atmen. Bewährt hat sich bewusstes Ausatmen bei Belastung und Einatmen in der Entlastung. Am besten aber, du atmest ganz „natürlich“ - Übungsausführung beachten.
Wenn du die richtige Stärke des Bandes gewählt hast, solltest du die Übung sauber und ohne Ausweichbewegungen mehrere Male ausführen können. Wenn du merkst, die Bewegung wird unsauber, breche deine Reihe ab und wähle nächstes Mal einen geringeren Widerstand.
Dynamik beachten.
Achte darauf, das Band immer leicht auf Spannung zu halten. Die Bewegung sollte niemals allein mit Schwung ausgeführt werden, sondern immer kontrolliert und kraftvoll sein. Auch die Entlastung sollte nie plötzlich geschehen, sondern immer kontrolliert.
Los geht’s
Lege das Band zwischen Daumen und Zeigefinger. Nun wickelst du das Band so um die Hand, dass es fest sitzt und du dich ganz auf die Übung konzentrieren kannst, ohne das Band vorm Wegrutschen schützen zu müssen. Auch bei den Übungen mit geknotetem Band, oder befestigtem Band, sollten die Punkte stets stabil sein.
Achte auf einen festen Stand, oder eine stabile Körperposition und festen Rumpf. Das Band sollte in der Startposition bereits leichte Spannung erzeugen, jedoch nicht zu stramm sitzen. Führe nun jede Übung 10-15 Mal langsam, sauber und kontrolliert aus. Bei einseitigen Übungen stets auch die Seite wechseln. Wer möchte, kann mehrere Sätze der Übungen absolvieren.
Übung 1: Oberer Rücken, Schulter-/Nackenbereich
Mit dieser Übung wirkst du den im Alltag und Triathlon häufig nach vorne gerichteten Bewegungen entgegen. Sie schult deine Körperhaltung und stärkt den oberen Rücken sowie Schulter- und Nackenbereich.
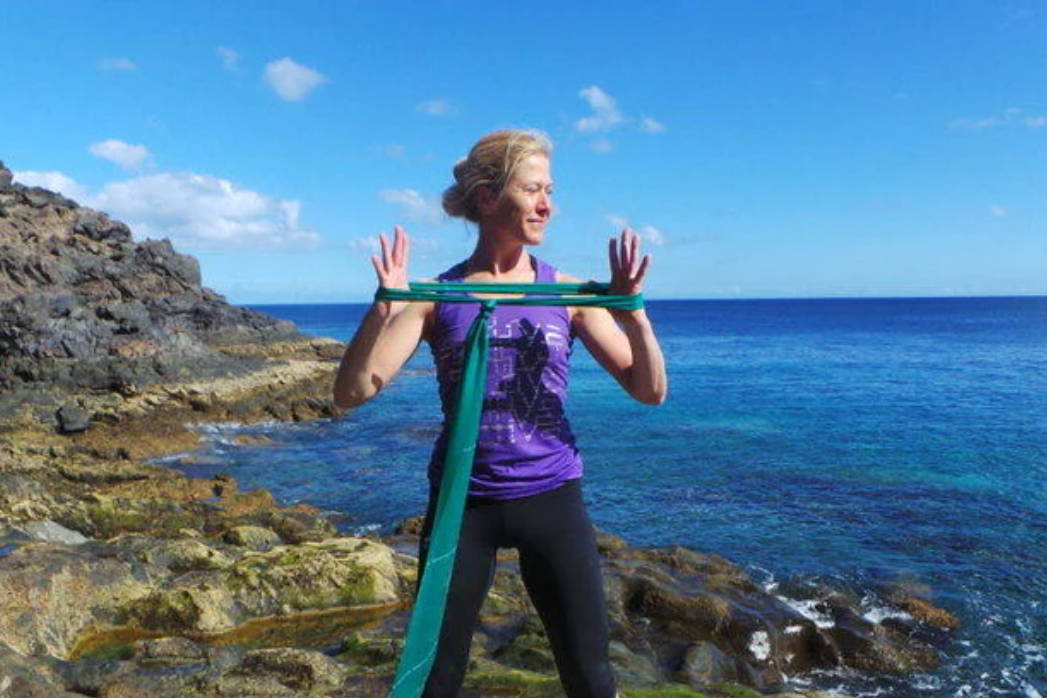
Verknote das Theraband, sodass du eine Schlinge hast. Lege die Schlinge um deine Hände. Das Theraband ist knapp unter Kinnhöhe, deine Handflächen zeigen nach innen. Nun presse die Handrücken gegen das Theraband nach außen. Halte den Druck für einige Sekunden und löse dann vorsichtig.
Achte auf aufrechte Körperhaltung!
Übung 2: Bauch, Po, Äußere Oberschenkelmuskulatur
Mit dieser Übung trainierst du nicht nur die Bauchmuskulatur, sondern auch die äußere Oberschenkelmuskulatur und Gleichgewicht!
Lege die Schlaufe nun um deine Knöchel. Setze dich auf den Boden, lehne dich zurück und hebe die Beine angewinkelt, bis die Unterschenkel ungefähr parallel zum Boden sind. Nimm nun noch die Hände an den Hinterkopf. Halte nun zunächst nur die Position. Wer das beherrscht, kann mit den Beinen nun noch Druck nach außen gegen das Theraband aufbauen. Kurz halten und dann vorsichtig lösen.
Achte auf einen geraden Rücken!
Übung 3: Triceps
Kein Abdruck beim Schwimmen? Dann brauchst du diese Übung!
Greife mit einer Hand die Schlaufe und halte sie stabil vor deiner Brust. Die andere Hand stemmt sich von innen mit der Handfläche gegen das Band. Der Arm sollte nun ca. im rechten Winkel angewinkelt sein, die Hand auf Hüfthöhe. Aus dieser Position bringst du den Arm nun nach hinten in die Streckung. Nach den Wiederholungen Seite wechseln.
Achte auf stabilen Stand in leichter Schrittstellung.
Übung 4: Gluteus maximus
Dieser Muskel ist nicht umsonst der größte unserer Muskeln. Wir brauchen ihn für nahezu jede Aktion und eine Schwäche kann vor allem im Sport weitreichende Folgen haben. Am offensichtlichsten wird uns eine solche auf den Laufstrecken dieser Welt, wenn erschöpfte Triathleten eingesunken daherkommen.
Nimm eine Seitlage ein. Lege die Schlaufe um den Knöchel des unteren Beines und lege dies im rechten Winkel vor dem Körper ab. Der Fuß des oberen Beines tritt in die Schlaufe. Bei rechtwinkliger Knieposition schiebe nun den Fuß gegen den Widerstand in kleinen Bewegungen nach hinten.
Achte darauf, dass Körper und oberer Oberschenkel eine Linie bilden und die Schiebebewegung parallel zum Boden geschieht.
Übung 5: Schultern, Latissimus
Nicht nur dehnt diese Übung die Brustvorderseite auf, sondern stärkt auch Schultern und Latissimus – die Muskeln, die wir im Schwimmen besonders stark nutzen.
Greife das lange Theraband mit beiden Händen. Strecke es über den Kopf und sorge für eine leichte Spannung. Nun ziehst du das Band noch ein Stück weiter auseinander.
Achte darauf, dass das Band über dem Kopf bleibt und du nicht nach vorne ausweichst.
Übung 6: Hüftbeuger, vordere Oberschenkelmuskulatur
Hüftbeuger und vordere Oberschenkelmuskulatur sind nicht nur wichtig für das Radfahren, sondern zum Beispiel auch für einen aufrechten Laufstil.
Lege die Schlaufe in Rückenlage um deine Füße. Ein Bein ausstrecken. Das Andere bei anwinkeln und mit dem Fuß gegen die Spannung des Bandes arbeiten. Das Knie Richtung Brust ziehen, dabei jedoch den Kniewinkel beachten, der nicht über 90° sein sollte.
Achte auch darauf, dass deine Wirbelsäule und dein Becken stets fest am Boden aufliegen! Übrigens: Neben Kräftigung ist besonders hier das Dehnen extrem wichtig. Viele Sportler haben nämlich verkürzte Hüftbeuger!
Übung 7: Hoher Ellenbogen
Die Außenrotation des Oberarms kennen wir beim Schwimmen vom hohen Ellenbogen unter Wasser. Mit dieser Übung könnt ihr diese Bewegung nicht nur im trockenen nochmals üben, sondern auch durch Kräftigung Schulterschmerzen entgegenwirken.
Den Oberkörper in eine gebeugte Stellung/Waagrechte bringen. Das Theraband sollte ungefähr in Hüfthöhe befestigt sein. Das Bandende um die Hand wickeln, um es nicht festhalten zu müssen. Ausgangsposition ist ein nach vorne gestreckter Arm bei leicht gebeugtem Ellenbogen. Nun aus der Ausgangsposition den Unterarm in eine senkrechte Position zum Untergrund bringen.
Beachte, der Oberarm bleibt in nahezu unveränderter Position!
Übung 8: Po, äußere Oberschenkelmuskulatur
Noch eine Übung, die den Gluteus Maximus, sowie die seitlichen Teile stärkt.
Nimm eine Seitlage ein. Lege die Schlaufe um deine Knöchel. Das untere Bein bleibt stabil liegen, während das obere Bein gestreckt gegen den Widerstand nach oben arbeitet.
Achte darauf, dass du weder nach vorne, noch nach hinten kippst, sondern alle Bewegungen sauber nach oben ausgeführt werden!
Übung 9: Oberer Rücken
Schule deine aufrechte Haltung und wirke Nackenproblemen entgegen.
Das Theraband mittig knapp unter Hüfthöhe befestigen. Wickle das Band jeweils so um die Hände, dass es stabil ist. Bringe das Band auf Spannung, indem du die ausgestreckten Arme knapp unter Brusthöhe in kleinen Bewegungen nach hinten drückst. Dabei sollten sich deine Schulterblätter zueinander bewegen.
Achte auf einen stabilen Rumpf!
Übung 10: Triceps 2
Die Variante zu Übung 3 stärkt ebenfalls den für das Schwimmen nötigen Triceps. Hierbei kannst du dich sogar an der Schwimmbewegung orientieren und den letzten Teil des Zuges simulieren.
Das Theraband mittig knapp über Hüfthöhe befestigen. Wickle das Band jeweils so um die Hände, dass es stabil ist. Beuge dich vor, lege die Oberarme am Körper an und halte das Band bei rechtwinkliger Ellenbogenposition leicht auf Spannung. Strecke den Arm nun abwechselnd oder gleichzeitig nach hinten aus.
Achte auf stabilen Stand!
Viel Spaß beim Training!

