Um eine optimale Regenerationsfähigkeit zu entwickeln, können im Yoga verschiedene wirkungsvolle Übungen praktiziert werden. Wesentliche Aspekte sind hier verschiedene Entspannungstechniken wie Muskelrelaxation oder Tiefenentspannung. Darüber hinaus sind das lange, intensive Dehnen und das Beobachten der eigenen Atmung wesentliche Aspekte regenerativer Übungen. Auch reine Atemtechnik, die im Yoga sehr umfangreich ist, kann schon zu einer Erholung reichen. Dennoch gilt eine verkürzte Brustmuskulatur verhindert eine optimale Atembewegung.
Aus therapeutischer Sicht sinnvoll: Tonusregulation. Da man nicht genau sagen kann, welcher Teil des vegetativen Nervensystems verstärkt aktiv ist, versucht man sowohl sympathische als auch parasympathische Bereiche zu stimulieren.
Bereiche des Parasympathikus
Kehlkopfmobilisation (Der Nervus Vagus als größter parasympathischer Vertreter hat einen engen anatomischen Verlauf zum Kehlkopf. Oszillationen auf dem os sacrum (Kreuzbein). Wenn sich die Atmung harmonisiert oder es zu einer vom Athlet unbewusst forcierten Ausatmung kommt, ist das ein Anzeichen für einen parasympathischen Ausgleich.
Bereiche des Sympathikus
Nervengeflechte (sog. Plexen) im Oberbauch durch Oszillationen zu stimulieren. Im Bereich der Brustwirbelsäule. Technik hierfür wäre das sogenannte „rib raising“. Sympathische Bereiche zeigen sich oft als sehr schmerzempfindlich. Wenn die Schmerzempfindlichkeit nachlässt, ist das ein Anzeichen für vegetativen Ausgleich.
Bei einer regenerativen Yogastunde werden die Übungen meistens ohne langes Aufwärmen ausgeführt. Der Athlet versucht mit geringem muskulären Kraftaufwand, zwischen drei bis fünf Minuten, die Position zu halten. Durch das lange Verweilen in den Haltungen wird der Körper dazu gebracht, innere Spannungen zu lösen und tiefer in die Dehnung bis in die tieferen Bindegewebsschichten (Faszien) zu gelangen. Bei dieser Form des Faszien Yogas atmet man bewusst in die gedehnten Körperpartien hin. Sanft und bewusst schreitet man durch die Ausatmung weiter in die Dehnung. Immer mehr Studien belegen, dass neben der Muskulatur vor allem das Bindegewebe auf Stress und Anspannung reagiert und sogar Schmerzen verursachen kann.
Taube/Kapotasana
Anleitung::
- Ausgangslage: Vierfüßlerstand
- Deine Hände sind unter den Schultern, deine Knie hüftbreit aufgestellt
- Bring ein Knie nach vorn und leg es auf dem Boden leicht hinter deinem Handgelenk ab. Dein Schienbein bildet eine Diagonale. Deine Ferse zeigt zu deinem Körper
- Zentriere dein Becken
- Dein anderes Bein ist gerade nach hinten ausgestreckt, ohne es nach außen zu ziehen. Dein Knie sowie die Oberseite deines Fußes liegen auf dem Boden ab
- Stütz dich mit gespreizten Fingerspitzen fest im Boden ab und halte deinen Oberkörper gerade. Dein Blick ist nach vorne gerichtet, Nacken und Schultern sind entspannt, deinen Bauchnabel ziehst du Richtung Wirbelsäule ein
- Spanne deinen Beckenboden an
- Mit deiner Ausatmung lehnst du dich langsam nach unten, indem du mit den Fingern nach vorne wanderst. Spanne dabei deinen Beckenboden an, um deinen Rücken zu unterstützen und deine Hüfte stabil zu halten.
Darauf solltest du achten:
- Gewichtsverteilung: Dein Gewicht ist auf beiden Beinen gleichmäßig verteilt
- Extrem verkürzter Hüftbeuger: Halte anfangs den Fuß des angewinkelten Beines nah an der Hüfte oder platziere ihn sogar unter deinem Gesäß, sodass dein Unterschenkel parallel zum gestreckten Bein steht. Wenn dir die Dehnung beim Vornüberbeugen zu intensiv ist, lege ein Kissen, deine Hände oder deine Unterarme unter die Stirn. Du kannst mit den Ellbogen und Händen auch in einer höheren Position verharren, um langsam deine Dehnfähigkeit zu trainieren
- Nacken: Lasse Hals und Nacken lang und entspannt
- Verzicht: Bei Knieverletzungen oder -problemen solltest du die Yoga-Taube zunächst nicht ausüben
Anbei zwei liegende Übungen, die eine Flankenatmung unterstützen. Die Flankenatmung ist lediglich ein Atemfluss, der in die Flanken geführt wird, sodass sich die Rippenbögen weiten.
Krokodil / Nakarasana – Drehhaltung in der Rückenlage
Anleitung:
- Lege dich gerade auf deinen Rücken
- Arme liegen seitlich horizontal weggestreckt von deinen Schultern
- Beine in einem rechten Winkel in der Luft halten und aus dieser Lage vorsichtig beide Knie in jeweils in eine Richtung am Boden ablegen
- Oberschenkel stehen im 90°Winkel zur Wade
- Knie liegen in etwa auf Nabelhöhe
- Atme tief und ruhig in den Bauchraum. Beim Ausatmen wird der Kopf zu einer Richtung gedreht, die Körperhaltung verlagert sich entgegengesetzt.
- Schultern als auch Arme berühren weiterhin den Boden
- Eine Verstärkung der Haltung kann erlangt werden, wenn du mit der entgegengesetzten Hand des Beines das Knie weiter zum Boden drückst, solange sich keiner der Schulterblätter vom Boden lösen
Darauf solltest du achten:
- Schultern: Beide Schultern sollten immer in Kontakt mit dem Boden bleiben
- Wirbelsäule: Versuche die Wirbelsäule gerade zu halten, indem du dein Gesäß vorher nach rechts bzw. links ziehst bevor du deine Knie im rechten Winkel auf den Boden ablegst.
Banane/Flankendehnung
Anleitung::
- Um Trizeps, Flanken und Abduktoren schonend zu dehnen legst du dich flach auf den Rücken.
- Gesäß bleibt fixiert am Boden.
- Der Kopf legst du in die Ellenbogenbeuge.
- Dein Rumpf wandert so weit wie möglich mit dem Kopf in eine Richtung.
- Becken parallel und Gesäß weiterhin am Boden halten.
- Das Bein der gebeugten Seite des Rumpfes ziehst du so weit in die gleiche Richtung, solange auch hier dein Gesäß die Haftung am Boden nicht verliert. Bist du an der Endposition angekommen, legst du das andere Bein über dieses Bein und verhakst die Füße leicht
- Atme tief und bewusst in die gedehnte Flanke.
- Schließe die Augen und verweile in dieser Haltung für mehrere Minuten und
- lege dich danach wieder mittig und gerade auf die Matte und spüre nach.
- Wechsle nun die Seite.
Darauf solltest du achten:
- Gesäß: Das Gesäß sollte immer in Kontakt mit dem Boden bleiben
- Vorsichtiges Beenden der Übung: Wenn du aus der Übung herausgehst, löse erst den Fuß vom anderen und lege die Beine wieder zurück zur Mitte der Matte. Anschließend bewegst du deinen Rumpf ebenso zurück zur Mitte der Matte und löst dann vorsichtig deinen Kopf von deinem Arm.
- Nachspüren: Schließe nochmals deine Augen und spüre nach
Dehnung der Hüft- und Gesäßmuskulatur im Liegen
Anleitung:
- Starte in der Rückenlage
- Beine sind hüftbreit angewinkelt
- Eine Ferse auf das aufgestellte Bein, vor das Knie auflegen
- Umfasse deine Kniekehle des aufgestellten Beines mit dienen Händen
- Löse dann auch dein aufgestelltes Bein vom Boden bis du eine Dehnung im Gesäß spürst
- Dein Becken bleibt auf der Unterlage liegen
- Die Dehnung kannst du intensivieren, indem du alternativ deine Hände vor dein Knie hältst anstatt in der Kniekehle. Außerdem kannst du mit dem Ellbogen sanft dein nach außen rotiertes Bein noch weiter von dir weg pressen
Darauf solltest du achten:
- Nacken: Der Nacken sollte entspannt bleiben, die Schulter auf dem Boden leicht aufliegen. Fehlt es hier an der Beweglichkeit, können Decken unter den Kopf gelegt werden, um eine Entlastung im Nackenbereich zu erlangen.
- Hüfte: Diese Übung wird aus der Hüfte ausgeführt, dein Knie sollte hierbei keinen Druck verspüren
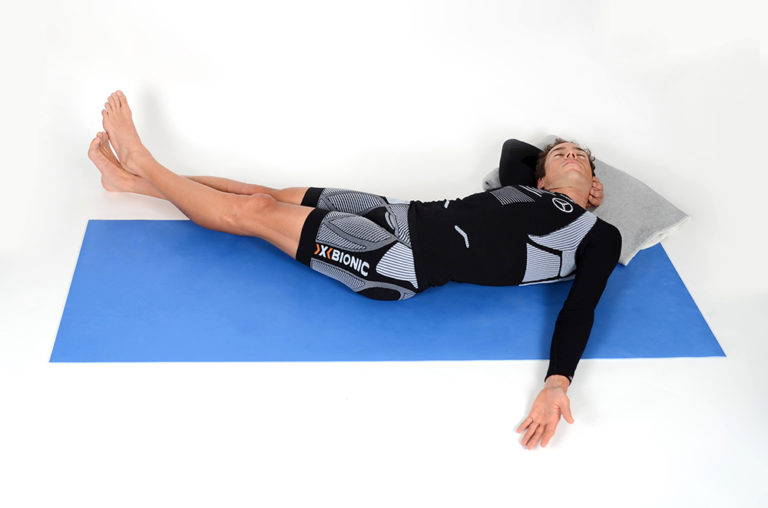
Endentspannung/Totenstellung (Savasana)
Die Endentspannungshaltung klingt wie die augenscheinlichste, einfachste und schönste Übung des Yogas. Leider stellt diese Haltung, die mit der größten Herausforderung dar. Ähnlich wie bei der Meditation kann sie uns an die Grenzen unseres Bewusstseins bringen. Viele neigen dazu in dieser Haltung einzuschlafen. Dabei wird eine große Konzentration gefordert. Gerne wird diese Haltung ignoriert. Doch gerade in dieser Haltung hat der Körper die Zeit die Anspannungen der Yogastunde zu verarbeiten, Stresshormone wieder abzubauen und neue Kraft zu tanken.
Anleitung:
- Lege dich flach auf den Rücken.
- Lege die Füße hüftbreit ab und lasse sie natürlich nach außen gleiten
- Das Becken ist entspannt
- Die Arme solltest du im 30-45° Winkel neben den Oberkörper legen. Achte darauf, dass deine Schultern nicht hochgezogen sind. Handflächen zeigen nach oben, damit sich Brust und Schultern öffnen
- Überprüfe, dass die Wirbelsäule lang ist
- Atme langsam und tief ein. Mit jeder Ausatmung lässt du deinen Körper tiefer in den Boden sinken und entspannst alle Muskeln
- Verweile in dieser Ruheposition, während du versuchst an nichts zu denken. Kommen dennoch Gedanken auf, versuche zurückzukehren und deinen Atem zu beobachten
- Gehe im Geiste deinen Körper von unten nach oben durch und entspanne diese. Beginne mit deinen Füßen, Beinen, Gesäß, Bauch, Rücken, Schultern, Arme, Hände, Nacken Kopf und Scheitel. Entspanne auch die Gesichtsmuskulatur. Du kannst auch detaillierter durch den Körper wandern: Bsp.: Kiefer, Lippen, Zunge, Nase, Wangen, Stirn und Kopfhaut.
- Diese Haltung solltest du für mindestens 5 Minuten halten, aber nicht länger als 20 Minuten. Finde für dich eine geeignete Dauer
- Um diese Entspannungshaltung zu verlassen, strecke dich oder mache dich ganz klein und rund. Ziehe deine Beine an, lege dich auf die rechte Seite in die Embryonalhaltung. Setze dich anschließend mit geschlossen Augen hin und atme nochmals bewusst tief ein und aus. Nimm’ die Arme nochmals bei der Einatmung nach oben über den Kopf und bringe deine Hände in die Gebetshaltung vor deiner Brust. Schenke dir selbst ein Lächeln und verneige dich vor dir selbst, indem du Namasté aussprichst. Namasté bedeutet: Ich grüße das Göttliche in dir! Namasté kommt aus dem Sanskrit, „nam“ für „sich verneigen“ und ist ein Zeichen höchsten Respekts, den man auch für sich selbst wahren sollte
Darauf solltest du achten:
- Halswirbelsäule: je nach Kopfform, kann es unangenehm sein auf der Matte aufzuliegen. Geht es dir auch so? Dann versuche doch mal eine weiche Yogadecke unter den Kopf zu legen.
- Unterer Rücken: Liegt dein Steißbein hart auf, oder ist Savasana für dich unangenehm? Dann versuche es mit einem Yogapolster unter deinen Knien.
- Gedankenkarussell: Wenn du sie versuchst krampfhaft zu unterdrücken, bewirkt das häufig das Gegenteil. Besser ist die Konzentration auf z.B. den Atem.